Blog
How to Resize an Image for Printing: 7 Easy Methods Without Losing Quality

Getting an image file ready for printing? Wondering how to resize an image for printing without losing its quality? Whether you want to print that image for preserving treasured memories, creating eye-catching custom photo stickers, or using it as marketing materials, facing quality loss when attempting to resize images is a common occurrence.
In this article, together we will discover how to resize an image for printing. CustomAny has listed here 7 practical methods to streamline the process without losing your image quality. So, let’s get started to say goodbye forever to pixelated prints!
How to Resize an Image for Printing using Design Software
Let’s start by learning how to resize an image for printing with top 3 professional design software.
1. Photoshop
Adobe Photoshop is the first choice for many professionals when it comes to how to resize an image for printing. Its extensive toolset and raster graphics capabilities make it an ideal choice for resizing images while maintaining quality.
How to resize an image for printing using Photoshop:
- Open your image in Photoshop.
- Navigate to the “Image” menu and select “Image Size.”
- In the dialog box, enter your desired dimensions for the print size. Make sure the “Resample” option is checked to maintain image quality.
- Choose the appropriate resolution for your printing needs. A resolution of 300 pixels per inch (PPI) is typically recommended for standard prints.
- Click “OK” to apply the changes.
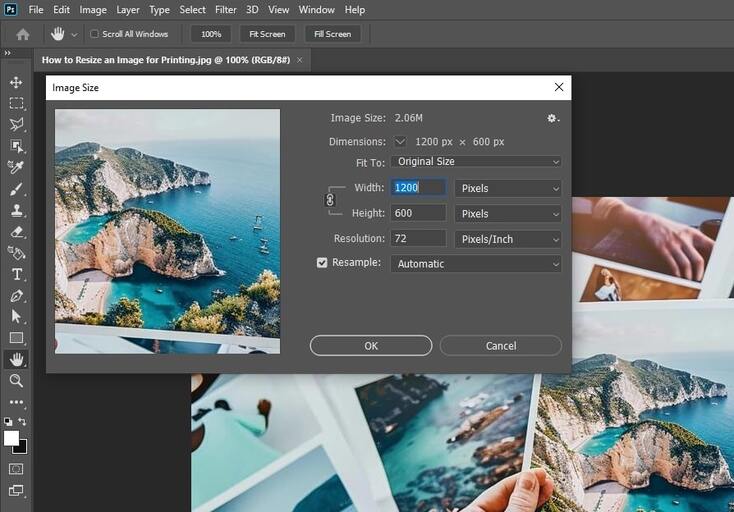
This way, you can resize images for printing with precision and confidence, ensuring high-quality results every time.
2. Adobe Illustrator
Adobe Illustrator is renowned for its vector graphics capabilities, making it an excellent choice for creating scalable artwork that retains quality at any size. While primarily used for creating illustrations and graphics, Illustrator can also be utilized to resize raster images for printing.
How to resize an image for printing using Adobe Illustrator:
- Open your image in Illustrator.
- Select the image and navigate to the “Object” menu, then choose “Rasterize.”
- In the dialog box, specify the resolution and other settings for rasterization. Higher resolutions typically result in better print quality.
- After rasterizing the image, resize it by selecting and dragging the corners while holding down the Shift key to maintain aspect ratio.
- Once resized, proceed to print the image directly from Illustrator or export it in the desired format.
Illustrator’s vector-based approach and rasterization capabilities enable seamless resizing of images for printing, preserving quality effortlessly.
3. Adobe Lightroom
While not as robust as Photoshop or Illustrator, Lightroom excels in maintaining image quality during resizing when it comes to how to resize an image for printing.
How to resize an image for printing using Adobe Lightroom:
- Import your image into Lightroom.
- In the Develop module, navigate to the “File” menu and select “Export.”
- In the Export dialog box, specify the dimensions and resolution for the print size. Maintain a resolution of 300 PPI for optimal print quality.
- Choose the desired file format and destination for the resized image.
- Click “Export” to save the resized image for printing.
Lightroom’s intuitive interface and non-destructive editing workflow make resizing images for printing a hassle-free task, ensuring the integrity of your photographs remains intact.
How to Resize an Image for Printing using Free Tools
While professional design software offers powerful features for resizing images, there are also several free tools available that can get the job done effectively.
4. Image Resizer
Image Resizer is a simple yet efficient tool designed specifically for resizing images without compromising quality. Its straightforward functionalities make it a popular choice for a hassle-free resizing solution.
To resize an image for printing using Image Resizer:
- Go to the Image Resizer website.
- Upload your image to the tool.
- Add your desired dimensions and allow Image Resizer to adjust the resolution to maintain quality.
- You can select the suitable file format under the resizing space
- Click “Resize” to apply the changes.
- Click Download your resized image
5. Adobe Resizer
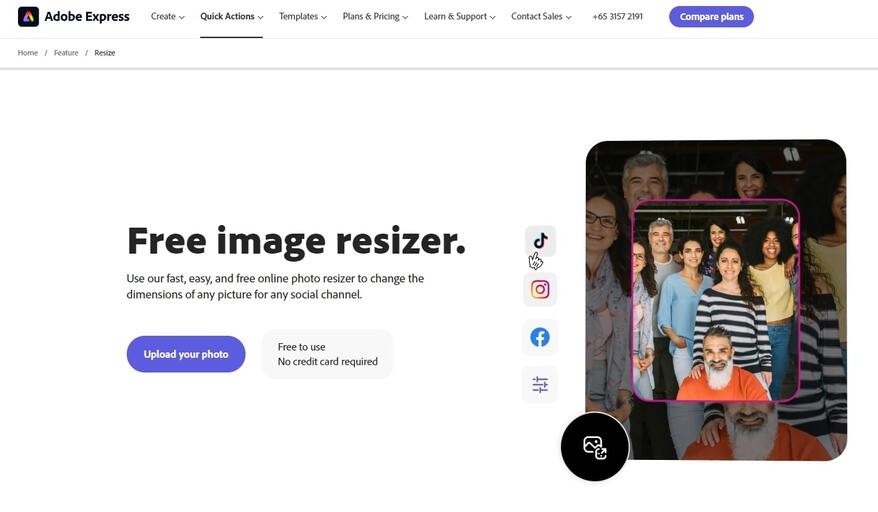
Adobe Resizer is a free online tool developed by Adobe, known for its commitment to quality and innovation in the field of digital imaging. This tool offers a range of features tailored for resizing images while preserving their quality.
To resize an image for printing using Adobe Resizer:
- Go to Adobe Resizer, click Upload your photo and choose your image file
- You can choose the optimal image size for the common social media from the drop down menu or choose “Custom” and fill in with your desired dimension.
- Click “Download” to apply the changes and save your file.
6. iLoveIMG
iLoveIMG is one of the most versatile online image editing platforms. iLoveIMG – Resize Image allows you to resize multiple images at once, so it is a common choice when it comes to how to resize an image for printing without sacrificing quality.
How to resize an image for printing using iLoveIMG:
- Visit the iLoveIMG resizer website.
- Upload your image to the tool.
- Fill in the desired dimensions for your desired print size. iLoveIMG will automatically adjust the resolution to maintain image quality.
- Click “Resize IMAGES” to apply the changes.
- Then, click Download the resized image to save it to your computer..
7. PicResize
PicResize is also a free online image resizing tool that offers a range of features for adjusting image dimensions while preserving quality.
To resize an image for printing using PicResize:
- Visit the PicResize website.
- Upload your image to the tool.
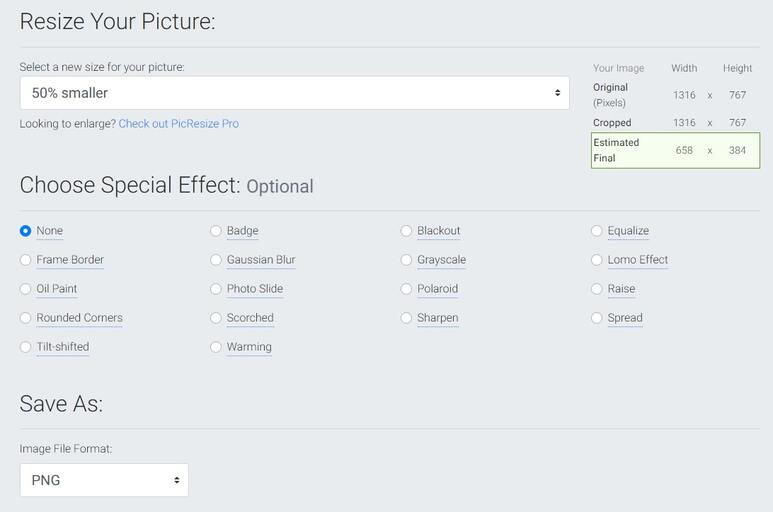
- You can choose whether to crop the image manually or scroll down to the resize part. Here, select the suitable option in the drop down menu.
- Choose “Custom Size” and specify your desired dimensions for the print size. PicResize will automatically adjust the resolution to ensure optimal print quality.
- In the Choose Special Effect section, you can optionally add more effects to your file.
- In the Save As action, select the format and JPG Quality that you want
- Click “I’m done, resize my picture!” to apply the changes.
- Download the resized image and proceed to print it as you want.
While professional design software may offer advanced features for resizing images, free tools also provide viable alternatives for users looking to resize images for printing without compromising quality. So, choose the one that suits your needs.
Adjusting DPI Settings to Keep Image quality
Apart from choosing the right software or tool, adjusting the DPI (dots per inch) settings is crucial for resizing images without sacrificing quality. DPI refers to the number of dots of ink per inch that a printer can produce, directly impacting the clarity and sharpness of printed images.
The recommended DPI for printing standard images is typically 300 DPI, ensuring crisp and detailed prints.
By adjusting the DPI settings according to the intended print size and purpose, you can ensure that your resized images maintain their quality and clarity, resulting in professional-looking prints every time.
Last words
Whether it’s preserving memories, crafting marketing materials, or making photo stickers, resizing images for printing requires maintaining their quality. We hope that our suggestions on How to Resize an Image for Printing can help you gain the suitable size without losing image’s resolution.
Want to explore more expert tips on printing? Our blog page is your destination. From choosing the right paper stock to mastering color management, our comprehensive resources offer invaluable insights to enhance your printing projects. Let’s take a look and gain more insights!


