Blog
How to Apply Iron On Transfers Flawlessly: 8 Pro Tips for the Best Result

In the previous blog post of “What are iron transfers and how to use them“, we’ve found iron on transfers offer us an easy and adorable way to customize any fabric-based items with customized designs. However, achieving the best result requires you to pay much attention and properly handle the application process.
So, if you want to improve your iron-on skill, CustomAny is here to share 8 effective and practical tips such as fabric preparation, temperature settings, timing,… These tips will help you apply iron-on transfers like a pro, avoiding common mistakes and enhancing durability. So, let’s get started.
1. Choose the Right Fabric for Iron On Transfers

The first thing you need to keep in mind when using iron on transfers is to select the appropriate fabric. Specifically, the fabric’s texture, stretchability, and its ability to tolerate heat all affect how well the iron on transfers adhere and how durable they remain.
The best materials to apply iron on transfers on are:
- Cotton and cotton blends
- Polyester fabrics
- Canvas
- Denim,…
These types of fabrics can withstand the heat required for transferring without damage. They also provide a proper texture and stretchability that allows the adhesive layer of the transfer to bond firmly and less likely to crack.
On another hand, there are types of fabrics can pose challenges when using heat transferring:
- Highly stretchy materials like spandex or elastane have higher capacity to make iron on transfers to crack or peel when stretched.
- Rough or textured surfaces such as heavy knits may leave space so the transfer designs can’t adhere wholly on them, leading to uneven results.
- Heat-sensitive fabrics like nylon, silk or leather may melt or discolor under high temperatures used for transfer.
By only choosing appropriate fabrics to use iron on transfers on, you will reduce the risk of peeling, fading, or damaging the item as well as the printed design you are about to apply.
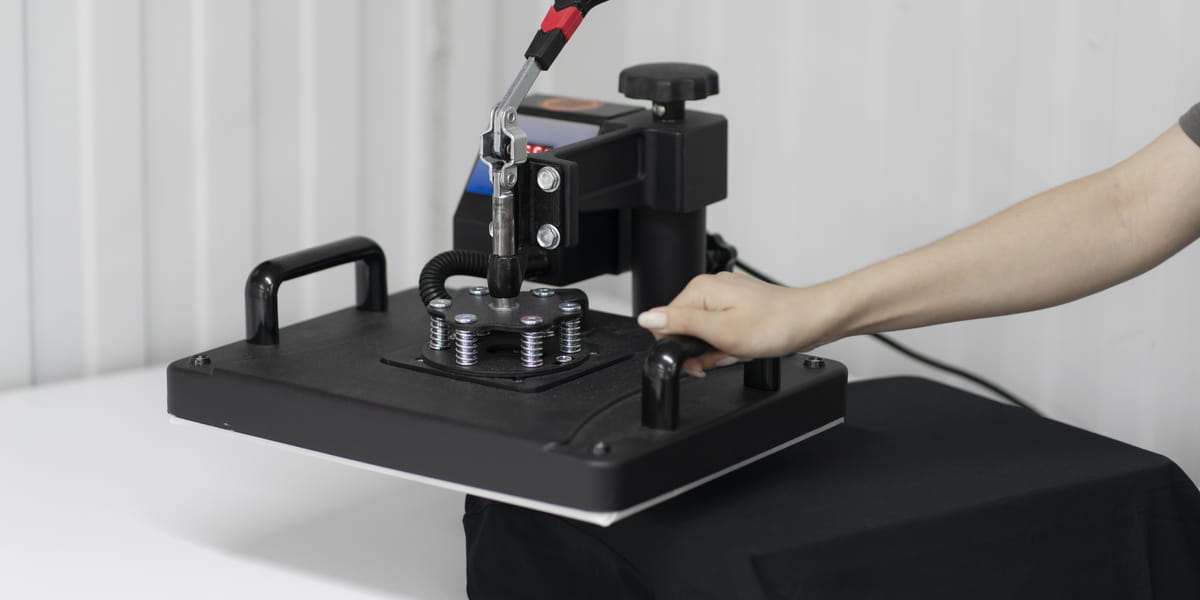
2. Choose the Right Heat Transfer Method

Besides knowing where to apply, with what method to transfer the iron on is also important for achieving the best results. Both a household iron and a heat press can work well, but each has its own pros and cons depending where and when you use each of them.
Here’s a quick comparison:
Household Irons
- Pros: They are affordable, easy to use at your home. They are small and portable. They are better for small designs.
- Cons: They may not provide even heat or pressure which can lead to incomplete adhesion or uneven spots. You may need more skill to adjust the application to achieve the best result.
You can see that a household iron is more accessible and convenient for small projects or occasional use.
Heat Press machines
- Pros: They are known for great consistent heat & pressure. Allowing a large pressed area, these machines are ideal for large designs.
- Cons: Heat press machines are available at higher cost. They are large in size and most of them require a fixed position.
Thus, a heat press will deliver a professional finish and is suitable for large batches production.
3. Make sure the Surface is ready

Next step in making sure your iron on transfers adhere well and last long is preparing a proper surface. It should be a clean and dry surface.
Why does it need to be clean? Because any residue like dust or lint can prevent parts of the design from sticking properly, leading to peeling or uneven results.
Why does it need to be dry? Because moisture blocks the adhesive, preventing the iron-on from bonding evenly.
So, we create a checklist to help you prepare your fabric:
- Making sure it is dry.
- Using a lint roller or shake the fabric to remove lint, dust, or dirt.
- Using a heat press or household iron, press the area for 5-10 seconds to remove any wrinkles and moisture trapped in the fibers.
Then, you have a smooth, flat surface, which helps prevent air bubbles and patchy areas in your iron on transfers.
4. Positioning and Alignment
Imagine how easily a slightly crooked or off-center applied iron on can spoil your perfect project. Now you’ve realized accurate placement is essential for professional-looking results when applying iron on transfers.

To achieve accuracy, you need to take a moment to measure and adjust before applying heat to the iron on transfer. You can use some positioning tools, such as:
- Ruler or measuring tape (they are helpful in checking equal spacing from seams, edges, or collars)
- T-square ruler or alignment guide (they are especially useful for centering designs on larger items like t-shirts or tote bags)
- Chalk or washable fabric pencil (you can use these simple tools to mark guidelines for precise aligning your iron on)
You should double-check the iron-on placement viewing from different angles or with a far sight. Besides, we recommend using heat-resistant tape to hold the iron on transfers securely in place during ironing or heat pressing.
This careful step will minimize the risk of misaligned applications and ensure your iron on transfers look just like you intend.
5. Correct Heat & Right amount of Pressure
The success of heat transferring iron-ons mostly depends on heat and pressure you use.
A proper heat level prevents your iron on as well as your fabric getting scorched, while proper pressure prevents incomplete transfers or air bubbles. These two factors make the best adhesive from bonding for long lasting results.
For your information, most iron-on transfers work well at 310°F (155°C) with medium pressure applied for 20–30 seconds. However, settings can vary based on fabric type, so it’s always smart to check your manufacturer’s recommendations.

Key tips for setting heat and pressure:
- A household iron works fine for small projects but make sure to press firmly and evenly over the entire design. Do not move it side to side.
- Never use steam settings on your iron because moisture disrupts adhesion.
- You should use a heat press for even, controlled pressure — ideal for larger or professional jobs.
- Test on a fabric scrap if possible, especially when you are working with unfamiliar materials.
Adjusting both heat and pressure properly ensures your iron on transfers bond cleanly and lasts through multiple washes.
6. Do not risk it – Test first
Even if you are familiar with using iron on transfers many times before, testing is a step worth taking because every fabric type can behave differently.
Why you should take this testing step:
- Verifies heat settings and pressure levels
- Checks adhesive performance on specific fabrics
- Prevents ruining your actual item
You can test beforehand with these surfaces:
- A leftover piece of the same material
- The inside or back of the intended garment
- A fabric with similar texture and color
This testing step lets you check how the material reacts to heat, whether the adhesive bonds well, and if the colors hold up without fading.
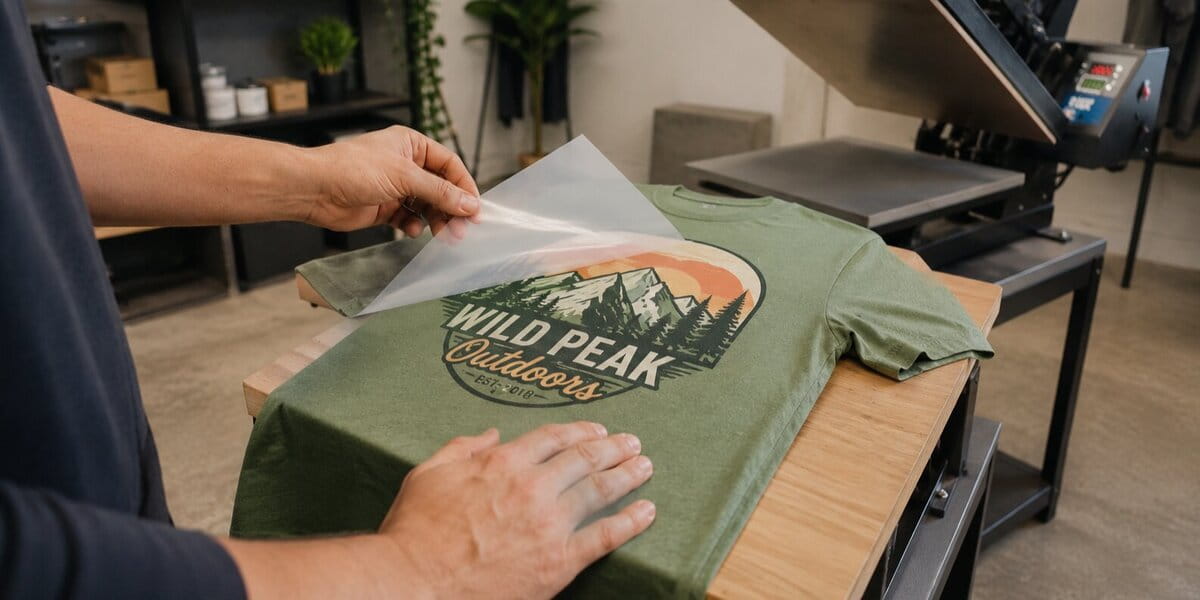
7. Peel at the Right Temperature
One of the most overlooked steps after pressing iron on transfers is peeling the film layer at the correct temperature.
For most iron-ons including our products, you should wait 15–20 seconds before peeling. It’s the ideal time for the material to cool slightly, allowing the adhesive to settle and grip the fibers more securely. If you peel off the film layer too soon or too late, the printed designs may be lifted with the film, causing uneven edges or cracked results.
How to handle peeling properly:
- After pressing, let the iron on transfers cool for 15–20 seconds
- Gently peel the film off in a smooth, steady motion
- For larger designs, peel slowly from one corner to check adherence
If part of the design lifts:
- Lay the film back down carefully
- Apply heat again for a few extra seconds using the same pressure
However, it’s strongly advisable that you carefully follow transfer instructions, as some iron-ons may require a warm or cold peel depending on the material used.
8. Finish with a Teflon or Parchment Sheet

The last tip to make sure your iron on transfers have a clean, polished finish and securely bonds with the item is to press one final time.
We recommend using a Teflon or parchment sheet to cover your iron-on in this extra step as it prevents direct contact between the heat source and the transfer, avoiding unwanted shine or scorching.
Here’s how to do it:
- After peeling the backing film, place a Teflon sheet or parchment paper over the iron on transfer
- Apply heat again for 15–20 seconds using firm, even pressure
- Allow it to cool before handling the garment
This final press ensures every edge of your iron on transfer adheres smoothly, reducing the chance of peeling or cracking after washing. It also enhances the texture, giving a matte finish as if it is a factory-produced DTG (direct to garment) item.
Last words
Iron on transfers can give you clean, durable, and sharp-looking results if you can handle the application with proper care. With 8 tips we’ve covered above you will minimize common issues when applying and ensure your iron on transfers hold up well through a long time of use.
If you’re looking for high-quality and easy-to-apply iron on transfers for your project, explore our product page here. Each design of iron-ons you send to us will be printed with clarity and produced with durability, giving you reliable results for customizing t-shirts, totes, home decor, or any other idea you have in mind.