Blog
How to turn photos into stickers? Effortless ways to do at home

If you’ve ever wanted to give your photos a fun and playful twist, or to save your memories, just turn photos into stickers. If you want to transform ordinary images into adhesive gems that can be used for scrapbooking, decorating personal items, or even sharing with friends, again, turn them into stickers.
In this article, we will explore 3 easy methods to turn photos into stickers. Whether you prefer the hands-on approach of printing and cutting, the convenience of software and machines, or the professional touch of printing services, we’ve got you covered.
So, let’s unlock the ways to convert your photos into captivating stickers.
1. Turn photos into stickers by Printing and Cutting
How to turn picture into sticker easily? The first way to turn photos into stickers is using the traditional method of printing and cutting. This is a straightforward and accessible approach.
Materials you’ll need:
- A printer: You can use either an inkjet or laser printer, depending on your preference and the quality you desire for your stickers.
- Sticker paper: Choose the appropriate type of paper based on your printer and the desired outcome. While picture sticker paper provides adhesive backing for easy application, you can also use photo paper for a more professional look. However, you’ll need to use tape or other adhesive to use stickers printed on photo paper.
- Scissors or craft knife: These tools are essential for cutting out your printed photos and removing any excess parts.
Now you have all the materials and tools, how to make a sticker from a photo? – Just follow these 5 simple steps to turn photos into stickers:
- Select the photos: Choose the images you want to transform into stickers. They can be personal photographs, family or friends photographs, photographs of your pets, landscape images or any other digital image you wish to use. Make sure that your photos are high-quality.
- Print the photos: Load the sticker paper (or photo paper) into your printer and print the images. Make sure to follow the printer’s instructions for loading and printing.
- Let them dry: Allow the printed photos to dry completely before moving on to the next step to avoid smudging or damaging the images.
- Cut out the stickers: Carefully use scissors or a craft knife to cut out the printed photos, following the desired shape or outline. You can cut it into a face sticker, or a full body sticker, or make it a landscape photo sticker. Take your time to ensure precise and clean cuts.
- Remove excess parts: Trim any excess areas or background from the stickers, leaving only the desired image. This step is crucial for achieving a polished and professional appearance.
- Peel and stick: If you used sticker paper, peel off the backing to reveal the adhesive side of the sticker. Apply the sticker to any clean and dry surface, pressing firmly to ensure proper adhesion.

That’s it! You got the photo stickers of your wish. While making and using it, remember to:
- Test the adhesive strength of your sticker paper before using it on valuable or delicate items, as some adhesives can leave residue or damage surfaces.
- Experiment with different sizes, shapes, and textures of paper to create unique sticker designs that suit your preferences and intended use.
Turning photos into stickers by printing and cutting brings you the freedom to create unique shapes right at home, it is also cost-effective. However, this method requires manual cutting, which can be time-consuming and may not provide the same professional finish as other methods. So, let’s consider the second method for a more professional outcome.
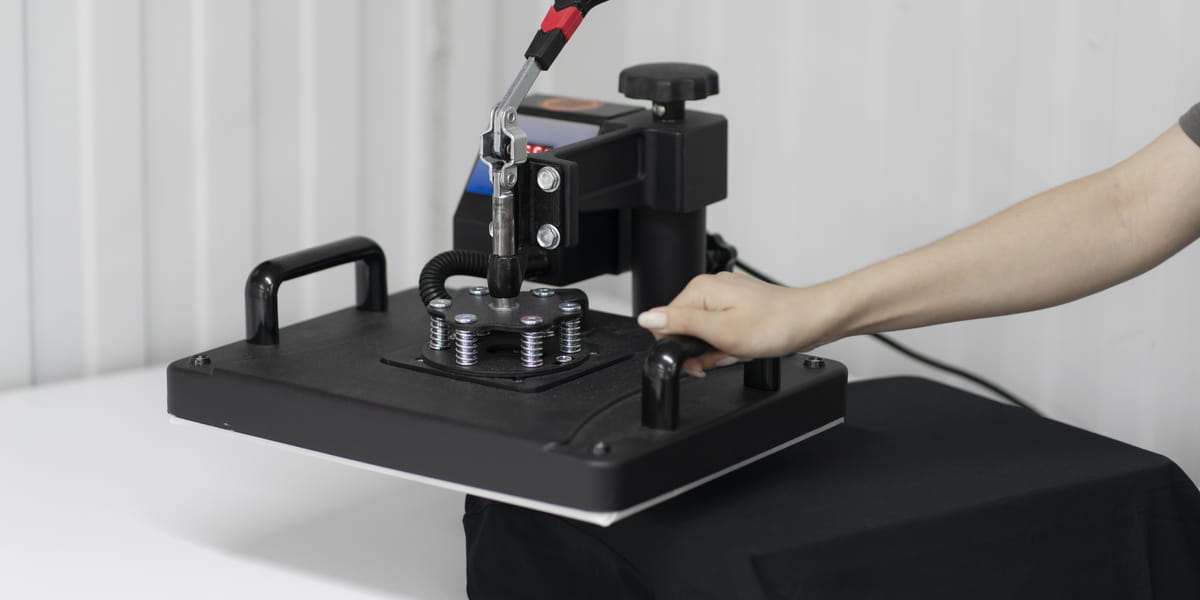
2. Turn photos into stickers using software and machines
If you prefer a more advanced and precise approach to turn photos into stickers, utilizing software and machines can streamline the process.
To embark on this method, you will need the following materials and tools:
- Computer with photo editing software: Choose a photo editing software that allows you to edit images, such as Adobe Photoshop, Adobe Illustration, or Canva for those who are not much professional in designing. These programs provide advanced features for removing unnecessary parts and preparing your photos for printing.
- Printer: Similar to the first method, you will need an inkjet or laser printer capable of producing high-quality prints.
- Cutting machine or plotter: Invest in a cutting machine or plotter such as a Cricut or Silhouette. These machines can precisely cut out your printed photos, saving you time and ensuring accurate results.

Now, how to make a picture into a sticker with these machines? – Follow these 6 steps to turn photos into stickers using software and machines:
- Import and edit the photo: Open your chosen photo editing software and import the image you want to turn into a sticker. Use the software’s tools to remove any unnecessary parts, adjust the size, or enhance the image as desired.
- Prepare for printing: Set up your photo editing software to match your printer’s settings. Ensure the image is correctly sized and formatted for printing.
- Print the photo: Send the edited image to your printer and print it onto photo paper or sticker paper. Follow the printer’s instructions for loading and printing.
- Load the paper into the cutting machine: Prepare the cutting machine or plotter by placing the printed paper onto the cutting mat and securing it in place.
- Cutting: Adjust the settings on the cutting machine or plotter, specifying the desired cut lines and ensuring proper alignment with the printed photo. Then you start the machine and allow it to precisely cut out the printed photo according to your specified parameters.
- Peel and stick: Last step is to peel it off and stick it on. Make sure your desired surface is clean and dry.
In this method, you’ll need to:
- Familiarize yourself with the functions and settings of your chosen photo editing software and cutting machine to ensure optimal results.
- Follow the safety guidelines provided by the manufacturer when operating the cutting machine or plotter.
- Regularly clean and maintain your printer and cutting machine to prolong their lifespan and ensure accurate photo stickers.
3. Turn photos into stickers using printing service
For those seeking a professional touch or wishing to print their photos in bulk, order from a printing service provider is an excellent option. This method is particularly advantageous for individuals who may not possess the necessary skills or equipment for home printing.
- Preparing:
Before proceeding with a printing service, you should prepare your photos for printing. Ensure that your images are high-resolution and properly edited: cropping the image to remove any unnecessary elements, resizing it if needed and adding a white border to the image if you like. These will contribute to the quality of the final sticker prints. …
- Choosing a printing company:
When selecting a printing company to turn photos into stickers, it’s essential to opt for a reputable printing company. This ensures you receive high-quality photo stickers and responsive customer support.
Consider using our printing service, because with CustomAny’s experts’ help, you can enjoy reliable printing, various customization options, competitive pricing, and efficient delivery. For an easier visualization, here is a pet photo stickers we’ve made:

- Check proof:
Once you have chosen a printing service, send them your photos to turn into stickers, you will typically have the option to review a proof of your photo stickers before finalizing the order.
Take this opportunity to carefully inspect the proof, ensuring that the colors, resolution, and overall appearance meet your expectations. If any adjustments are needed, communicate them promptly to the printing service.
- Receive the stickers:
After approving the proof, the printing service will proceed with producing your photo stickers. Depending on the company’s processing time and shipping method, you can expect to receive the stickers within a specified timeframe.
This method offers you high-quality and professional-looking custom picture stickers, with a very little effort. However, there are some things you need to pay attention to if you choose a third-party service to turn photos into stickers:
- When choosing a printing service, read reviews and compare prices to ensure you select the best option for your needs.
- Consider the quantity of stickers you require, as printing services often offer discounts for bulk orders.
- Remember to provide clear instructions and specifications to the printing service to ensure the desired outcome for your photo stickers.
Conclusion
Transforming your photos into stickers opens up a world of creative possibilities, allowing you to personalize items and share cherished memories in a unique and fun way. Throughout this article, we have explored 3 main methods to turn photos into stickers. Each method offers its own advantages depending on your skill level, desired outcome, and quantity requirements.
While the first two methods provide DIY options, the convenience and professional touch of a photo sticker printing service cannot be overlooked.
For those who may lack the skills or equipment for home printing or those looking for a more polished result, we highly recommend using our printing service to create your custom photo sticker. Visit our website to view photos and feedback from our beloved customers and give these photo sticker customization options a try!