Blog
How to Make All Kinds of Custom Hats at Home Using DTF Transfers

Custom hats have become a popular choice for both personal style and brand promotion, which makes them valuable for both individuals and businesses. With DTF transfers, creating professional-looking hats at home is now much easier and more accessible.
In this guide, you will learn how to use DTF transfers to make different types of custom hats step by step. The article will cover the tools you need, the application process, adjustments for different hat styles, and the common mistakes to avoid so you can achieve cleaner and more consistent results.
Why do DTF Transfers Work for Hats
As hat customization grows, DTF transfers stand out as an efficient method for creating designs on different hat styles. Let’s explore what makes this method suitable for custom hats.
1. What Are DTF Transfers
DTF (Direct-to-Film) transfers, or iron-on transfers, are a printing method where designs are printed onto a special film, coated with adhesive powder, and then applied with heat.
Unlike traditional methods, DTF transfers work on various materials and surfaces, which makes them highly effective for hat printing. Whether for custom hats with logos or personalized designs, DTF offers a simple and reliable solution.
For more details, you can read the blog “Custom Iron On Transfers: What They Are & How to Use Them“
2. Key advantages for hats:
What makes DTF stand out for custom made hats is that they:
- Work on multiple materials such as cotton, polyester, and fabric blends, making it ideal for various custom printed hats.
- Compatible with different hat styles, including baseball caps, beanies, custom trucker hats, and custom snapback hats.
- Deliver fine details and full-color prints.
- Support flexible orders, making custom hats no minimum a practical option for small businesses or personal projects.
- Require no complicated tools or setup
Types of Hats You Can Customize at Home
Many hat styles can be customized at home with simple tools, such as:
- Baseball caps that have structured front panels
- Trucker hats with foam fronts and mesh backs
- Bucket hats for soft, flexible fabric
- Dad hats have an unstructured curved shape
- Beanies use stretch fabric, so they require extra care and are less ideal for custom hats.
What You’ll Need for Making Custom Hats
Before making custom hats, you need a few basic tools to ensure a smooth and effective process.
- DTF transfers that hold the printed artwork is needed to transfer the design onto the hat surface
- A heat press or household iron
- A hat press attachment
- Heat-resistant tape
- A Teflon sheet or parchment paper
How to Apply DTF Transfers on Hats (Step-by-Step)
Applying DTF transfers on hats is a practical way to create cheap custom hats at home without complicated equipment. With the right setup, you can make durable custom hats or even test small runs of custom hats at no minimum.
Step 1: Prepare the Hat
The first step is to prepare the hat surface properly. You should clean the area and remove dust, lint, or moisture because they can affect the transfer quality.
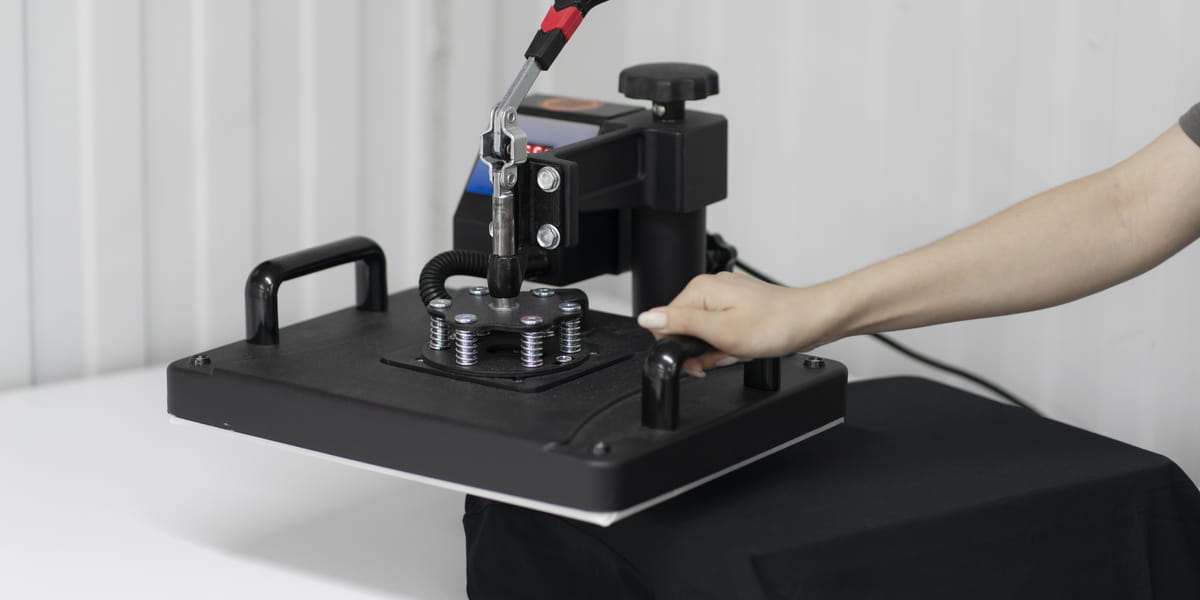
If using a heat press
- You should have a hat press attachment which is a curved metal form with a heat-resistant padded surface designed to match the shape of a hat.
- Place the hat press attachment onto the heat press machine then position the hat onto it. The attachment supports the front panel from inside and helps the heat and pressure spread more evenly across curved areas.
- Briefly pre-press the hat. This step removes wrinkles, and helps the hat hold a more stable shape for applying the transfer.
On the other hand, if you do not have a hat press attachment, you can place a towel or foam insert inside the hat to create a firmer surface. With this method, the pressure may spread less evenly as with a heat press, you should press carefully and work in smaller sections for better contact.
Step 2: Position the Transfer
Once the hat is ready, you need to place the transfer carefully.
- The design should be applied in the center or on the front panel, depending on the style.
- Besides, you should use heat-resistant tape to keep the transfer from moving.
- Since curved surfaces move easily without a hat press attachment, stable positioning is important.
Step 3: Apply Heat
Before pressing, place a sheet of parchment paper or a Teflon sheet over the DTF transfer. This protective layer helps distribute heat more evenly and prevents direct contact between the heat and the transfer surface.
Next, apply the DTF transfers following the transfer supplier’s instructions for temperature and pressing time. A hat press attachment gives better pressure across curved areas.
If you use a household iron or handheld press, you should work in smaller sections and adjust pressure manually for even performances.
Step 4: Peel and Finish
After pressing, you should:
- Let the transfer cool or stay warm as directed by supplier
- Peel the film slowly from one corner at a low angle and avoid lifting it straight upward.
- If any part lifts, press again.
- Check the edges and finish for an effective application
- Add a second press with a protective sheet for extra durability.
Adjusting the Process for Different Hat Types
Not all hats require the same application method, so adjusting the process is important for better results. Different shapes and materials affect how DTF transfers adhesive, especially when making custom hats or custom logo hats.
1. Structured hats
Structured hats have firm front panels, so they make the pressing process easier. The firm surface spreads pressure more evenly and helps the transfer stick better. Because of this, many people choose structured hats for clean custom hats.
2. Soft hats (bucket/5-panel hats)
Soft hats use flexible fabric, so they need lighter pressure during pressing. Too much pressure can distort the shape or stretch the material. A lighter press helps the design stick while keeping the hat in good condition.
3. Mesh hats:
Mesh hats require more attention because the mesh area cannot handle direct heat well. You should place the transfer only on solid fabric sections, such as the front panel. This method provides better adhesion and print quality.
4. Curved panels
Curved panels can make pressing more difficult because the surface is uneven. If needed, you should press in smaller sections to maintain steady contact and improve adhesion for better-looking custom hats.
Common Mistakes to Avoid
Applying DTF transfers on hats can be simple, but small mistakes often affect the design quality.
1. Uneven pressure
Uneven pressure causes weak adhesion and makes the edges peel after pressing. That’s why a stable surface and consistent force improve the process.
2. Wrong temperature/time
Incorrect heat and time settings often create problems during transfer. If the temperature is too low or the pressing time is too short, the design will not stick well. On the other hand, too much heat or time can damage the transfer or fabric.
To avoid these issues, you should always follow the temperature and timing guidelines provided by the transfer supplier.
3. Misalignment on curves
Unlike flat garments, hats have rounded front panels that affect the alignment. This shape makes spacing and centering more difficult, especially for detailed designs.
4. Skipping test press
A test press allows you to check pressure, heat, and placement before the final application. So, without this step, the result may be inconsistent and later lead to wasted materials.
By recognizing these common mistakes early, you can avoid wasted time, minimize material waste, and create more durable results for different hat styles.
3 Practical Tips for Better Results
Once you know the common issues that can affect transferring quality, you can focus on improving the application process. Following these practical tips will help you make high-quality custom hats with DTF transfers.
1. Use smaller designs for curved areas
Smaller designs fit curved hat surfaces more naturally and reduce the chance of wrinkles or lifting. A compact design also helps the pressure stay more even during pressing.
2. Always test first on a similar material
A test press gives you the chance to check temperature, timing, and pressure before the final application. Testing on similar fabric helps you find out problems early and improves consistency.
3. Invest in a hat press if you plan to scale
A hat press provides more even pressure on curved surfaces, which improves adhesion and print quality. If you plan to make more custom hats or handle larger orders, this tool saves time and offers a more consistent transferring performance.
Where to Print Custom DTF Transfers
Once you understand the process and learn how to work with different hat types, creating custom hats becomes much easier and more efficient. With the right tools and application methods, you can achieve professional results on different hat styles.
Additionally, choosing a trusted DTF transfer supplier is also important to ensure consistent quality. For example, we offer premium DTF transfers with vibrant colors, strong adhesion, and precise detail for different kinds of hats. On customany.com, you can easily upload your designs, order in flexible quantities, and enjoy fast production and shipping times.
So if you’re ready for creating custom hats faster, easier, and with dependable quality, let’s visit our product page here.